How to Integrate OpenAI API into a WooCommerce Plugin with PHP (2026)
Build an OpenAI WooCommerce plugin in PHP — encrypted API key storage, AJAX streaming, rate limiting, error handling, and a working product description generator.
Integrating the OpenAI WooCommerce plugin pattern into your PHP development unlocks AI-generated product descriptions, dynamic customer support responses, and intelligent upsell suggestions — all without leaving the WordPress ecosystem. Building an OpenAI WooCommerce plugin correctly means three things: storing the API key securely using WordPress encryption, calling the OpenAI API from PHP without exposing credentials to the browser, and handling rate limits and errors gracefully. This guide builds a complete, production-ready OpenAI WooCommerce plugin with a working product description generator as the practical example throughout.
The architecture for an OpenAI WooCommerce plugin is straightforward: a WordPress AJAX action handles the request from the admin UI, the PHP backend makes the OpenAI API call server-side using WordPress HTTP functions, and the response streams back to the browser. The API key never touches the frontend — this is the most important security principle for any OpenAI WooCommerce plugin.
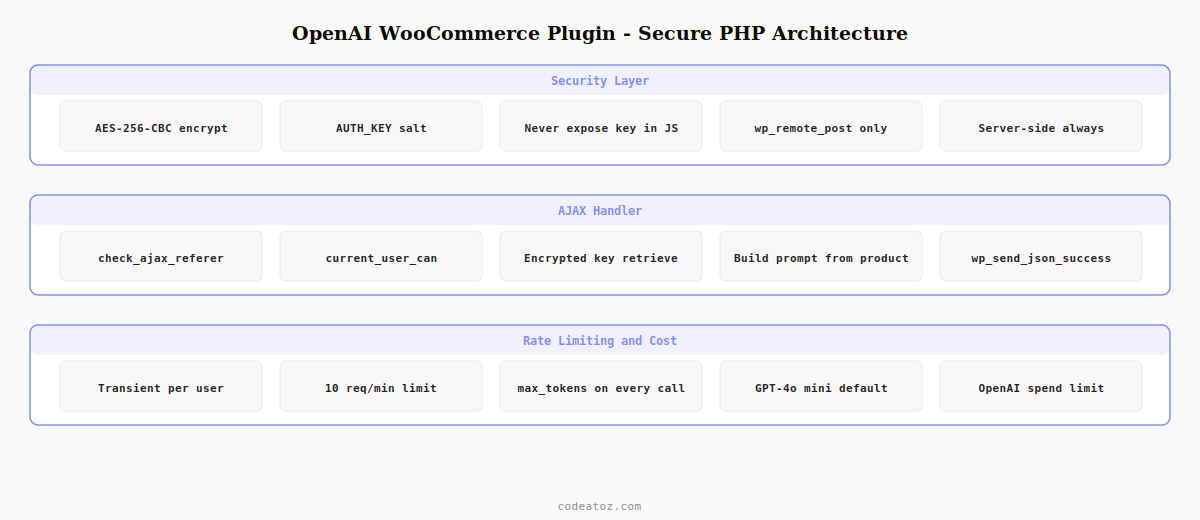
Step 1: OpenAI WooCommerce Plugin — Encrypted API Key Storage
Never store an OpenAI API key in plain text in the WordPress options table. Your OpenAI WooCommerce plugin must encrypt the key at rest using openssl_encrypt() with a site-specific salt. This protects the key if the database is ever exposed.
<?php
class CAZ_AI_KeyManager {

    private const OPTION  = 'caz_openai_key_enc';
    private const METHOD  = 'AES-256-CBC';

    private static function cipher_key(): string {
        // Derive a site-specific key — never use AUTH_KEY directly
        return substr( hash( 'sha256', AUTH_KEY . SECURE_AUTH_SALT ), 0, 32 );
    }

    public static function save( string $api_key ): void {
        $iv  = random_bytes( 16 );
        $enc = openssl_encrypt( $api_key, self::METHOD, self::cipher_key(), 0, $iv );
        update_option( self::OPTION, base64_encode( $iv . $enc ) );
    }

    public static function get(): string {
        $stored = get_option( self::OPTION, '' );
        if ( ! $stored ) return '';
        $raw = base64_decode( $stored );
        $iv  = substr( $raw, 0, 16 );
        $enc = substr( $raw, 16 );
        return openssl_decrypt( $enc, self::METHOD, self::cipher_key(), 0, $iv ) ?: '';
    }
}
⚠ Never call the OpenAI API with a key from a front-end JavaScript variable. Any key stored in JS or passed via REST without auth is exposed in the browser’s network tab. The PHP-side AJAX pattern in this OpenAI WooCommerce plugin guide is the only safe approach for WordPress.
Step 2: OpenAI WooCommerce Plugin — Admin Settings Page
Register a settings page in the WooCommerce settings panel for your OpenAI WooCommerce plugin. This gives store owners a familiar place to enter the API key and configure options like model selection and max tokens.
add_filter( 'woocommerce_get_sections_products', fn( $s ) => $s + ['caz_ai' => 'AI Settings'] );

add_filter( 'woocommerce_get_settings_products', function( $settings, $section ) {
    if ( 'caz_ai' !== $section ) return $settings;
    return [
        [ 'title' => 'OpenAI WooCommerce Plugin', 'type' => 'title', 'id' => 'caz_ai_title' ],
        [
            'title'   => 'OpenAI API Key',
            'type'    => 'password',
            'id'      => 'caz_openai_key_raw',
            'desc'    => 'Enter your OpenAI API key. It is encrypted before storage.',
            'default' => '',
        ],
        [
            'title'   => 'Model',
            'type'    => 'select',
            'id'      => 'caz_openai_model',
            'options' => [ 'gpt-4o' => 'GPT-4o', 'gpt-4o-mini' => 'GPT-4o mini' ],
            'default' => 'gpt-4o-mini',
        ],
        [ 'type' => 'sectionend', 'id' => 'caz_ai_end' ],
    ];
}, 10, 2 );

// Encrypt on save
add_action( 'woocommerce_update_options_products_caz_ai', function() {
    $raw = sanitize_text_field( $_POST['caz_openai_key_raw'] ?? '' );
    if ( $raw ) CAZ_AI_KeyManager::save( $raw );
    delete_option( 'caz_openai_key_raw' );  // never store plain text
} );
Step 3: OpenAI WooCommerce Plugin — AJAX Handler for API Calls
The AJAX handler is the core of the OpenAI WooCommerce plugin. It validates the nonce, retrieves the encrypted API key, builds the prompt from product data, and calls OpenAI via wp_remote_post(). All API logic runs server-side.
add_action( 'wp_ajax_caz_generate_description', 'caz_generate_product_description' );

function caz_generate_product_description(): void {
    check_ajax_referer( 'caz_ai_nonce', 'nonce' );

    if ( ! current_user_can( 'edit_products' ) ) {
        wp_send_json_error( 'Insufficient permissions', 403 );
    }

    $product_id = absint( $_POST['product_id'] ?? 0 );
    $product    = wc_get_product( $product_id );
    if ( ! $product ) wp_send_json_error( 'Product not found', 404 );

    $api_key = CAZ_AI_KeyManager::get();
    if ( ! $api_key ) wp_send_json_error( 'OpenAI API key not configured', 400 );

    $model   = get_option( 'caz_openai_model', 'gpt-4o-mini' );
    $prompt  = sprintf(
        'Write a compelling 150-word WooCommerce product description for: %s. ' .
        'SKU: %s. Price: %s. Tone: professional and persuasive. British English.',
        $product->get_name(),
        $product->get_sku() ?: 'N/A',
        wc_price( $product->get_price() )
    );

    $response = wp_remote_post( 'https://api.openai.com/v1/chat/completions', [
        'timeout' => 30,
        'headers' => [
            'Authorization' => 'Bearer ' . $api_key,
            'Content-Type'  => 'application/json',
        ],
        'body'    => wp_json_encode([
            'model'      => $model,
            'messages'   => [
                [ 'role' => 'system',  'content' => 'You are an expert e-commerce copywriter.' ],
                [ 'role' => 'user',    'content' => $prompt ],
            ],
            'max_tokens' => 250,
        ]),
    ]);

    if ( is_wp_error( $response ) ) {
        wp_send_json_error( $response->get_error_message(), 500 );
    }

    $body = json_decode( wp_remote_retrieve_body( $response ), true );
    $text = $body['choices'][0]['message']['content'] ?? '';

    if ( ! $text ) {
        wp_send_json_error( 'No content returned from OpenAI', 500 );
    }

    wp_send_json_success( [ 'description' => wp_kses_post( $text ) ] );
}
Step 4: OpenAI WooCommerce Plugin — Rate Limiting and Error Handling
OpenAI enforces rate limits per API key. Your OpenAI WooCommerce plugin must handle 429 responses gracefully and protect against users spamming the generate button. Use WordPress transients as a per-user rate limiter.
function caz_check_rate_limit( int $user_id ): bool {
    $key   = 'caz_ai_rate_' . $user_id;
    $count = (int) get_transient( $key );

    if ( $count >= 10 ) return false;   // max 10 requests per minute per user

    set_transient( $key, $count + 1, 60 );  // 60-second window
    return true;
}

// Add to AJAX handler before the API call:
if ( ! caz_check_rate_limit( get_current_user_id() ) ) {
    wp_send_json_error( 'Rate limit exceeded. Please wait 1 minute.', 429 );
}
The OpenAI Chat API documentation covers available models, parameters, and error codes. The WordPress HTTP API documentation covers wp_remote_post() options. Also see our guide on building a WooCommerce plugin from scratch for the full plugin boilerplate this code builds on.
💡 Cost control: always set max_tokens on every OpenAI API call in your OpenAI WooCommerce plugin. Without it, GPT-4o can return very long responses and rack up unexpected charges. For product descriptions, 200-300 tokens is sufficient.
Frequently Asked Questions — OpenAI WooCommerce Plugin
How do I store an OpenAI API key securely in a WooCommerce plugin?
Use PHP’s openssl_encrypt() with AES-256-CBC and a site-specific key derived from WordPress auth salts. Store only the encrypted value in the options table. Retrieve and decrypt server-side only when making API calls. Never pass the raw API key to the browser or store it in a plain text WordPress option in your OpenAI WooCommerce plugin.
Should I call the OpenAI API from PHP or JavaScript in a WooCommerce plugin?
Always call the OpenAI API from PHP in your OpenAI WooCommerce plugin — never directly from JavaScript. Calling from JavaScript exposes the API key in the browser’s network tab to anyone who inspects the page. Use a WordPress AJAX action with nonce verification to proxy the API call through PHP securely.
How do I handle OpenAI rate limits in a WooCommerce plugin?
Implement per-user rate limiting using WordPress transients to prevent individual users from exceeding your OpenAI quota. Check the transient count before every API call and return a 429 error with a helpful message if the limit is reached. Also handle 429 responses from OpenAI itself with exponential backoff retry logic in your OpenAI WooCommerce plugin.
Which OpenAI model should I use for a WooCommerce plugin?
GPT-4o mini is the best default choice for most OpenAI WooCommerce plugin use cases — it is significantly cheaper than GPT-4o and fast enough for product descriptions, short summaries, and classification tasks. Use GPT-4o when the task requires deep reasoning, complex multi-step instructions, or higher output quality that justifies the cost.
How do I add OpenAI-generated product descriptions to WooCommerce?
Build an OpenAI WooCommerce plugin with an admin button on the Edit Product page. The button triggers a WordPress AJAX call, the PHP handler builds a prompt from the product name, SKU, and attributes, calls the OpenAI API server-side, then returns the generated text to the browser where JavaScript inserts it into the product description editor field.
How do I control costs when integrating OpenAI into a WooCommerce plugin?
Set max_tokens on every OpenAI API call to cap response length and cost. Use GPT-4o mini instead of GPT-4o for most tasks. Implement per-user rate limits using WordPress transients. Cache OpenAI responses for identical inputs using WordPress transients with a reasonable TTL. Monitor usage in the OpenAI dashboard and set monthly spend limits to prevent unexpected charges.
Need AI Integrated into Your WooCommerce Store?
CodeAtoZ builds production AI integrations for WooCommerce — product description generators, recommendation engines, and intelligent chatbots.