Creating a Magento 2 REST API Custom Endpoint — Step-by-Step 2026
Build a Magento 2 REST API custom endpoint with webapi.xml, service contract interface, implementation class, ACL, and request validation. Full PHP and XML code.
Adding a Magento 2 REST API custom endpoint is the correct approach when you need to expose store data to a mobile app, headless frontend, or third-party integration that the built-in Magento REST API doesn’t cover. A Magento 2 REST API custom endpoint built using service contracts is secure, typed, versioned, and fully integrated with Magento’s ACL system — which means it respects admin and customer role permissions automatically. This guide builds a complete Magento 2 REST API custom endpoint from the webapi.xml declaration through the interface, implementation class, DI wiring, and input validation — with every file explained.
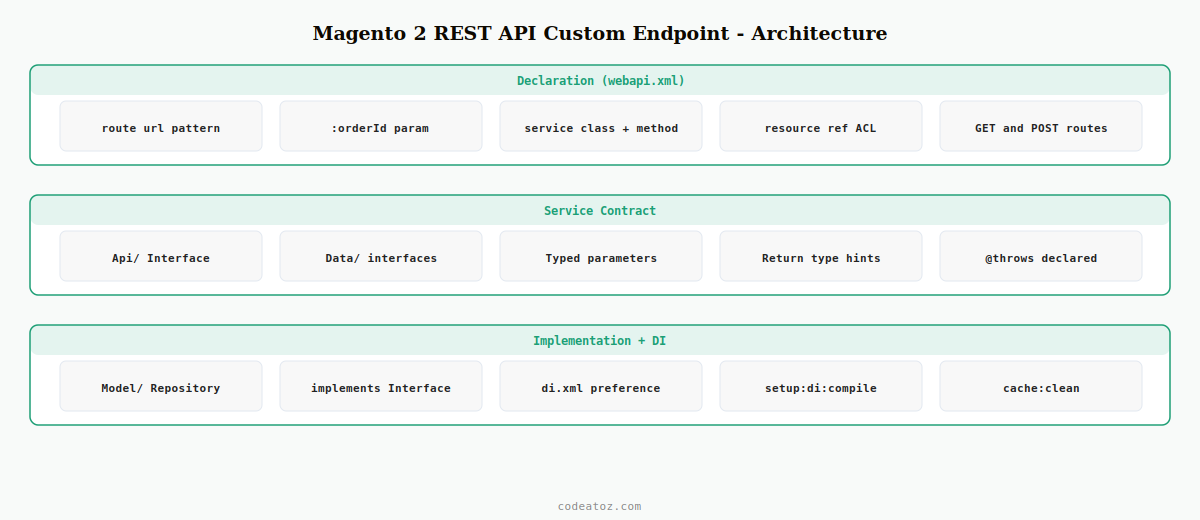
Magento 2 REST API custom endpoints are declared in etc/webapi.xml and backed by a service contract — a PHP interface that defines the method signature. Magento maps the REST route to an interface method, and the concrete implementation class is bound via etc/di.xml. This separation between interface and implementation is what gives Magento 2 REST API custom endpoints their testability and makes them safe to extend without modifying core code.
Step 1: Declare the Magento 2 REST API Custom Endpoint in webapi.xml
Every Magento 2 REST API custom endpoint starts with a declaration in etc/webapi.xml. This file maps an HTTP route and method to an interface method and specifies which ACL resource controls access. The URL structure follows /V1/your-module/your-resource for REST versioning.
<?xml version="1.0"?>
<routes xmlns:xsi="http://www.w3.org/2001/XMLSchema-instance"
        xsi:noNamespaceSchemaLocation="urn:magento:module:Magento_Webapi:etc/webapi.xsd">

    <!-- GET endpoint: fetch dispatch status -->
    <route url="/V1/caz-dispatch/order/:orderId" method="GET">
        <service class="CodeAtoZDispatchApiDispatchStatusInterface" method="getByOrderId"/>
        <resources>
            <resource ref="CodeAtoZ_Dispatch::dispatch_read"/>
        </resources>
    </route>

    <!-- POST endpoint: update dispatch status -->
    <route url="/V1/caz-dispatch/order/:orderId/status" method="POST">
        <service class="CodeAtoZDispatchApiDispatchStatusInterface" method="updateStatus"/>
        <resources>
            <resource ref="CodeAtoZ_Dispatch::dispatch_write"/>
        </resources>
    </route>

</routes>
The :orderId in the URL is a path parameter — Magento maps it to the matching argument name in the interface method. The resource ref points to an ACL resource defined in etc/acl.xml. Setting it to anonymous makes the Magento 2 REST API custom endpoint public — only do this for truly public data.
Step 2: Define the Service Contract Interface for the Magento 2 REST API Custom Endpoint
The interface is the contract of your Magento 2 REST API custom endpoint. It defines what parameters the methods accept and what data types they return. Magento uses these type hints to validate requests and to generate the OpenAPI documentation for your endpoint automatically.
<?php
namespace CodeAtoZDispatchApi;

interface DispatchStatusInterface
{
    /**
     * Get dispatch status for an order.
     *
     * @param int $orderId
     * @return CodeAtoZDispatchApiDataDispatchStatusInterface
     * @throws MagentoFrameworkExceptionNoSuchEntityException
     */
    public function getByOrderId( int $orderId ): CodeAtoZDispatchApiDataDispatchStatusInterface;

    /**
     * Update dispatch status for an order.
     *
     * @param int $orderId
     * @param CodeAtoZDispatchApiDataDispatchUpdateInterface $update
     * @return bool
     * @throws MagentoFrameworkExceptionLocalizedException
     */
    public function updateStatus(
        int $orderId,
        CodeAtoZDispatchApiDataDispatchUpdateInterface $update
    ): bool;
}<?php
namespace CodeAtoZDispatchApiData;
interface DispatchStatusInterface
{
public const ORDER_ID = 'order_id';
public const STATUS = 'status';
public const UPDATED_AT = 'updated_at';
public function getOrderId(): int;
public function getStatus(): string;
public function getUpdatedAt(): string;
public function setOrderId( int $orderId ): self;
public function setStatus( string $status ): self;
public function setUpdatedAt( string $updatedAt ): self;
}Step 3: Implement the Magento 2 REST API Custom Endpoint Logic
The implementation class contains the actual business logic of your Magento 2 REST API custom endpoint. It is injected via DI and must implement the interface exactly. Input validation, error handling, and data retrieval all live here.
<?php
namespace CodeAtoZDispatchModel;

use CodeAtoZDispatchApiDispatchStatusInterface;
use CodeAtoZDispatchApiDataDispatchStatusInterfaceFactory;
use CodeAtoZDispatchApiDataDispatchUpdateInterface;
use MagentoFrameworkExceptionNoSuchEntityException;
use MagentoFrameworkExceptionLocalizedException;
use MagentoSalesApiOrderRepositoryInterface;

class DispatchStatusRepository implements DispatchStatusInterface
{
    public function __construct(
        private readonly OrderRepositoryInterface $orderRepo,
        private readonly DispatchStatusInterfaceFactory $statusFactory,
        private readonly CodeAtoZDispatchModelResourceModelDispatchStatus $resource
    ) {}

    public function getByOrderId( int $orderId ): CodeAtoZDispatchApiDataDispatchStatusInterface
    {
        // Validate order exists — Magento 2 REST API custom endpoint best practice
        try {
            $this->orderRepo->get( $orderId );
        } catch ( Exception $e ) {
            throw new NoSuchEntityException( __( 'Order %1 not found.', $orderId ) );
        }

        $status = $this->statusFactory->create();
        $this->resource->load( $status, $orderId, 'order_id' );

        if ( ! $status->getId() ) {
            throw new NoSuchEntityException( __( 'No dispatch status for order %1.', $orderId ) );
        }

        return $status;
    }

    public function updateStatus( int $orderId, DispatchUpdateInterface $update ): bool
    {
        if ( ! in_array( $update->getStatus(), ['pending','dispatched','delivered'], true ) ) {
            throw new LocalizedException( __( 'Invalid status value for Magento 2 REST API custom endpoint.' ) );
        }

        $status = $this->statusFactory->create();
        $this->resource->load( $status, $orderId, 'order_id' );
        $status->setData([
            'order_id'   => $orderId,
            'status'     => $update->getStatus(),
            'updated_at' => date( 'Y-m-d H:i:s' ),
        ]);
        $this->resource->save( $status );
        return true;
    }
}
Step 4: Wire the Magento 2 REST API Custom Endpoint via di.xml
The final step is binding the interface to the implementation in etc/di.xml and registering the data model. This is the Magento 2 dependency injection pattern that makes the Magento 2 REST API custom endpoint testable — you can substitute a mock implementation in unit tests without changing any business logic.
<config xmlns:xsi="http://www.w3.org/2001/XMLSchema-instance"
        xsi:noNamespaceSchemaLocation="urn:magento:framework:ObjectManager/etc/config.xsd">

    <!-- Bind interface to implementation for Magento 2 REST API custom endpoint -->
    <preference for="CodeAtoZDispatchApiDispatchStatusInterface"
                type="CodeAtoZDispatchModelDispatchStatusRepository"/>

    <preference for="CodeAtoZDispatchApiDataDispatchStatusInterface"
                type="CodeAtoZDispatchModelDispatchStatus"/>

    <preference for="CodeAtoZDispatchApiDataDispatchUpdateInterface"
                type="CodeAtoZDispatchModelDispatchUpdate"/>

</config>
After creating all files, run bin/magento setup:di:compile to generate the interceptors and factory classes that Magento needs for your Magento 2 REST API custom endpoint. Then run bin/magento cache:clean. Test your endpoint with curl -X GET https://your-store.com/rest/V1/caz-dispatch/order/1 -H "Authorization: Bearer TOKEN".
The Adobe Commerce REST API service contract documentation covers the full webapi.xml schema. The Magento 2 dependency injection documentation explains di.xml preferences. See our Magento 2 DI guide and Magento 2 plugin vs observer guide for the broader extensibility architecture.
Frequently Asked Questions — Magento 2 REST API Custom Endpoint
How do I create a Magento 2 REST API custom endpoint?
Declare the route in etc/webapi.xml pointing to a service contract interface and method. Define the interface in Api/ with typed method signatures. Create the implementation class in Model/. Bind interface to implementation in etc/di.xml. Run setup:di:compile and cache:clean. The Magento 2 REST API custom endpoint is then available at /rest/V1/your-route.
How does ACL work for a Magento 2 REST API custom endpoint?
Define your ACL resource in etc/acl.xml under the Magento_Backend tree. Reference it in webapi.xml using resource ref. Magento checks whether the authenticated token has the specified ACL permission before allowing access to the Magento 2 REST API custom endpoint. Use anonymous as the resource ref only for genuinely public endpoints that require no authentication.
What is a service contract in a Magento 2 REST API custom endpoint?
A service contract is a PHP interface that defines the public API of your Magento 2 REST API custom endpoint — method names, parameter types, and return types. Magento uses these PHP type hints to validate input, serialise and deserialise JSON bodies, and generate OpenAPI documentation automatically. Never put business logic in the interface — that belongs in the implementation class bound via di.xml.
Do I need to run setup:di:compile after creating a Magento 2 REST API custom endpoint?
Yes. setup:di:compile generates the factory and interceptor classes that Magento needs to instantiate your implementation class and its dependencies. Without this step, your Magento 2 REST API custom endpoint returns a 500 error in production mode. In developer mode, Magento can generate these dynamically on first request, but compilation is still required before deploying to staging or production.
How do I pass a request body to a Magento 2 REST API custom endpoint?
Define a data interface (extending MagentoFrameworkApiExtensibleDataInterface or a plain interface) for the request body. Type-hint the method parameter in your service contract interface with this data interface type. Magento’s web API framework deserialises the JSON request body into an instance of this interface automatically, making the body properties available via the interface’s getter methods.
Can I create a Magento 2 REST API custom endpoint for guest customers?
Yes — set the resource ref in webapi.xml to anonymous for endpoints that should be accessible without authentication. For endpoints accessible to logged-in customers but not admins, use self as the resource ref, which maps to the customer’s own OAuth or token. The Magento 2 REST API custom endpoint can then use $this->userContext to identify the current customer and restrict data access accordingly.
Need Custom Magento 2 API Development?
CodeAtoZ builds Magento 2 REST API custom endpoints, GraphQL resolvers, and headless integrations — fully service-contract-based and upgrade-safe.