Creating a WooCommerce Custom Email in PHP — Complete Developer Guide (2026)
Build a WooCommerce custom email by extending WC_Email — class setup, trigger hooks, HTML template, plain text, admin settings, and conditional sending. Full PHP code.
Building a WooCommerce custom email from scratch is the correct approach whenever you need transactional messages that go beyond WooCommerce’s built-in templates — dispatch notifications, subscription renewal alerts, back-in-stock confirmations, or internal admin alerts. A WooCommerce custom email built by extending WC_Email integrates seamlessly with the WooCommerce email settings panel, respects the store’s email header and footer branding, supports both HTML and plain text, and appears in WooCommerce → Settings → Emails just like the default emails. This guide builds a complete WooCommerce custom email step by step with every file and hook explained.
WooCommerce’s email system is built on top of WordPress’s wp_mail() and uses a class-based architecture where each email type is its own PHP class extending WC_Email. When you create a WooCommerce custom email by extending this class, you get the WooCommerce email wrapper (header, footer, styles) for free, and your email appears in the admin settings panel where store owners can enable or disable it, change the subject, and customise the heading — without touching code.
Step 1: Create the WooCommerce Custom Email Class
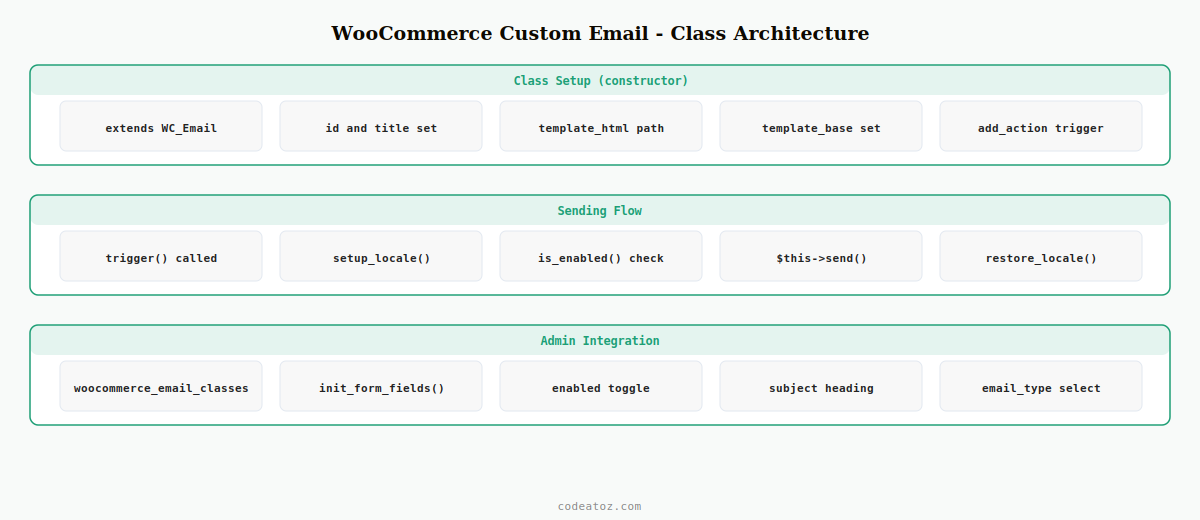
The WooCommerce custom email class extends WC_Email and sets up all its identity properties in the constructor. The id, title, description, and template paths are set here. The trigger hook that fires your WooCommerce custom email is also registered in the constructor.
<?php
if ( ! defined( 'ABSPATH' ) ) exit;

class CAZ_Email_Dispatch_Ready extends WC_Email {

    public function __construct() {
        // Unique id for this WooCommerce custom email
        $this->id             = 'caz_dispatch_ready';
        $this->title          = __( 'Dispatch Ready Notification', 'caz-plugin' );
        $this->description    = __( 'Sent to the customer when their order is ready for dispatch.', 'caz-plugin' );

        // Default content for this WooCommerce custom email
        $this->heading        = __( 'Your order is ready for dispatch', 'caz-plugin' );
        $this->subject        = __( '[{site_title}] Order #{order_number} is ready for dispatch', 'caz-plugin' );

        // Template files (relative to your plugin's woocommerce/ folder)
        $this->template_html  = 'emails/dispatch-ready.php';
        $this->template_plain = 'emails/plain/dispatch-ready.php';
        $this->template_base  = plugin_dir_path( __DIR__ ) . 'woocommerce/';

        // This is a customer-facing WooCommerce custom email
        $this->customer_email = true;
        $this->placeholders   = [
            '{site_title}'   => $this->get_blogname(),
            '{order_number}' => '',
            '{order_date}'   => '',
        ];

        // Register the trigger for this WooCommerce custom email
        add_action( 'woocommerce_order_status_awaiting-dispatch_to_dispatched_notification',
            [ $this, 'trigger' ], 10, 2 );

        // Call parent constructor LAST
        parent::__construct();
    }
Step 2: Implement the WooCommerce Custom Email trigger() Method
The trigger() method is called when the action hook fires. It sets up the order object, populates placeholder values, sets the recipient, and calls $this->send(). The WooCommerce custom email should check is_enabled() before sending so store owners can disable it from the settings panel.
    public function trigger( int $order_id, WC_Order $order = null ): void {
        $this->setup_locale();

        if ( $order_id && ! $order instanceof WC_Order ) {
            $order = wc_get_order( $order_id );
        }

        if ( ! $order instanceof WC_Order ) {
            $this->restore_locale();
            return;
        }

        $this->object = $order;

        // Populate placeholders for this WooCommerce custom email
        $this->placeholders['{order_number}'] = $order->get_order_number();
        $this->placeholders['{order_date}']   = wc_format_datetime( $order->get_date_created() );

        // Set recipient — customer email for this WooCommerce custom email
        $this->recipient = $this->get_option( 'recipient', $order->get_billing_email() );

        if ( ! $this->is_enabled() || ! $this->get_recipient() ) {
            $this->restore_locale();
            return;
        }

        $this->send(
            $this->get_recipient(),
            $this->get_subject(),
            $this->get_content(),
            $this->get_headers(),
            $this->get_attachments()
        );

        $this->restore_locale();
    }

    public function get_content_html(): string {
        return wc_get_template_html(
            $this->template_html,
            [ 'order' => $this->object, 'email_heading' => $this->get_heading(),
              'sent_to_admin' => false, 'plain_text' => false, 'email' => $this ],
            '', $this->template_base
        );
    }

    public function get_content_plain(): string {
        return wc_get_template_html(
            $this->template_plain,
            [ 'order' => $this->object, 'email_heading' => $this->get_heading(),
              'sent_to_admin' => false, 'plain_text' => true, 'email' => $this ],
            '', $this->template_base
        );
    }
} // end class
Step 3: Register the WooCommerce Custom Email with woocommerce_email_classes
WooCommerce discovers email classes via the woocommerce_email_classes filter. Your WooCommerce custom email must be added here before WooCommerce initialises its email system. Register this filter early — on plugins_loaded or directly in your main plugin file.
add_filter( 'woocommerce_email_classes', 'caz_register_custom_email' );

function caz_register_custom_email( array $email_classes ): array {
    require_once plugin_dir_path( __FILE__ ) . 'includes/class-email-dispatch-ready.php';
    $email_classes['CAZ_Email_Dispatch_Ready'] = new CAZ_Email_Dispatch_Ready();
    return $email_classes;
}
💡 The array key used when registering your WooCommerce custom email ('CAZ_Email_Dispatch_Ready') must match the class name exactly. WooCommerce uses this key to look up the email class for the settings panel, for bulk test sends, and for the email preview functionality added in WooCommerce 8.x.
Step 4: Create the WooCommerce Custom Email HTML Template
The HTML template for your WooCommerce custom email is a PHP file that uses WooCommerce’s email template functions. It wraps your content with the store’s standard email header and footer, including branding colours, logo, and footer links.
<?php
// WooCommerce custom email template — HTML version
defined( 'ABSPATH' ) || exit;

do_action( 'woocommerce_email_header', $email_heading, $email ); ?>

<p><?php printf(
    /* translators: %s: customer first name */
    esc_html__( 'Hi %s,', 'caz-plugin' ),
    esc_html( $order->get_billing_first_name() )
); ?></p>

<p><?php esc_html_e( 'Great news — your order is ready and will be dispatched today.', 'caz-plugin' ); ?></p>

<?php do_action( 'woocommerce_email_order_details', $order, $sent_to_admin, $plain_text, $email ); ?>

<?php do_action( 'woocommerce_email_order_meta', $order, $sent_to_admin, $plain_text, $email ); ?>

<?php do_action( 'woocommerce_email_customer_details', $order, $sent_to_admin, $plain_text, $email ); ?>

<?php do_action( 'woocommerce_email_footer', $email ); ?>
The WooCommerce email notifications documentation covers all available email action hooks and template variables. The WC_Email class reference documents all overridable methods. See our guide on WooCommerce custom order statuses for how to trigger this WooCommerce custom email on a status transition, and our WooCommerce plugin build guide for the full plugin structure.
Step 5: Add Admin Settings for the WooCommerce Custom Email
Override init_form_fields() in your WooCommerce custom email class to add configurable options in WooCommerce → Settings → Emails. Always include at minimum: enabled toggle, subject, heading, and email type (HTML/plain/multipart).
    public function init_form_fields(): void {
        $this->form_fields = [
            'enabled'    => [
                'title'   => __( 'Enable/Disable', 'caz-plugin' ),
                'type'    => 'checkbox',
                'label'   => __( 'Enable this WooCommerce custom email', 'caz-plugin' ),
                'default' => 'yes',
            ],
            'subject'    => [
                'title'       => __( 'Subject', 'caz-plugin' ),
                'type'        => 'text',
                'description' => sprintf( __( 'Placeholders: %s', 'caz-plugin' ), '{site_title}, {order_number}, {order_date}' ),
                'placeholder' => $this->get_default_subject(),
                'default'     => '',
            ],
            'heading'    => [
                'title'       => __( 'Email heading', 'caz-plugin' ),
                'type'        => 'text',
                'placeholder' => $this->get_default_heading(),
                'default'     => '',
            ],
            'email_type' => [
                'title'   => __( 'Email type', 'caz-plugin' ),
                'type'    => 'select',
                'options' => $this->get_email_type_options(),
                'default' => 'html',
            ],
        ];
    }
⚠ Common mistake: forgetting to call $this->init_settings() inside __construct() after parent::__construct(). Without this, your WooCommerce custom email admin settings are not loaded from the database and all options return their defaults even after the store owner saves them.
Frequently Asked Questions — WooCommerce Custom Email
How do I create a WooCommerce custom email without a plugin?
Create a PHP class that extends WC_Email, set your id, title, subject, heading, and template paths in the constructor, implement trigger() to handle the send logic, and register it via the woocommerce_email_classes filter. Place the class in a custom plugin — never in functions.php. The WooCommerce custom email then appears in WooCommerce Settings Emails automatically.
How do I trigger a WooCommerce custom email on an order status change?
Hook your trigger() method to the woocommerce_order_status_{from}_to_{to}_notification action, where {from} and {to} are the status slugs without the wc- prefix. Register this action inside the WooCommerce custom email class constructor. WooCommerce fires this action automatically whenever an order transitions between those two statuses, passing the order ID and order object.
Why is my WooCommerce custom email not appearing in the Settings panel?
The most common cause is registering the woocommerce_email_classes filter too late. It must fire before WooCommerce initialises its email system. Hook it on plugins_loaded or directly in your plugin’s main file. Also verify the array key in woocommerce_email_classes matches the class name exactly, and that the class file is being required before instantiation.
How do I add the WooCommerce email header and footer to a WooCommerce custom email?
In your HTML template file, call do_action(‘woocommerce_email_header’, $email_heading, $email) at the top and do_action(‘woocommerce_email_footer’, $email) at the bottom. These hooks output the store’s branded header image, heading, and footer with unsubscribe and address details — exactly as they appear in default WooCommerce emails.
Can I send a WooCommerce custom email to an admin instead of the customer?
Yes — set customer_email to false in the constructor and set the recipient in trigger() to get_option(‘recipient’, get_option(‘admin_email’)). Add a recipient field to init_form_fields() so the admin address is configurable from WooCommerce Settings. This pattern is correct for internal WooCommerce custom email alerts like low stock notifications or high-value order alerts.
How do I test a WooCommerce custom email without placing a real order?
WooCommerce 8.x added an email preview feature in WooCommerce Settings Emails. You can also manually trigger the action hook from a test script: do_action(‘woocommerce_order_status_{status}_notification’, $order_id, wc_get_order($order_id)). Use a staging environment with WP_DEBUG enabled and install the Email Log plugin to capture all outgoing emails during WooCommerce custom email development.
Need Custom WooCommerce Emails Built?
CodeAtoZ builds custom transactional email flows for WooCommerce — dispatch notifications, subscription alerts, back-in-stock emails, and branded admin alerts.