How to Create a Magento 2 Module from Scratch — Complete Guide
Build a production-ready Magento 2 module from zero — every file explained, full Hello World example included.
Learning how to create a Magento 2 module is the foundation of all Magento 2 development. Every customisation, every integration, every business logic addition requires you to create a Magento 2 module. Whether you’re extending the product catalogue, adding a REST API endpoint, or modifying checkout behaviour, everything starts with the same Magento 2 module structure covered in this guide. By the end, you’ll have a fully working module you can use as a template for every project.
PREREQUISITES
- Magento 2.4.x installed locally (Docker or native)
- PHP 8.1 or higher
- Composer installed globally
- SSH/terminal access to run bin/magento commands
- Basic PHP and XML knowledge
Understanding the Magento 2 Module Structure Before You Create It
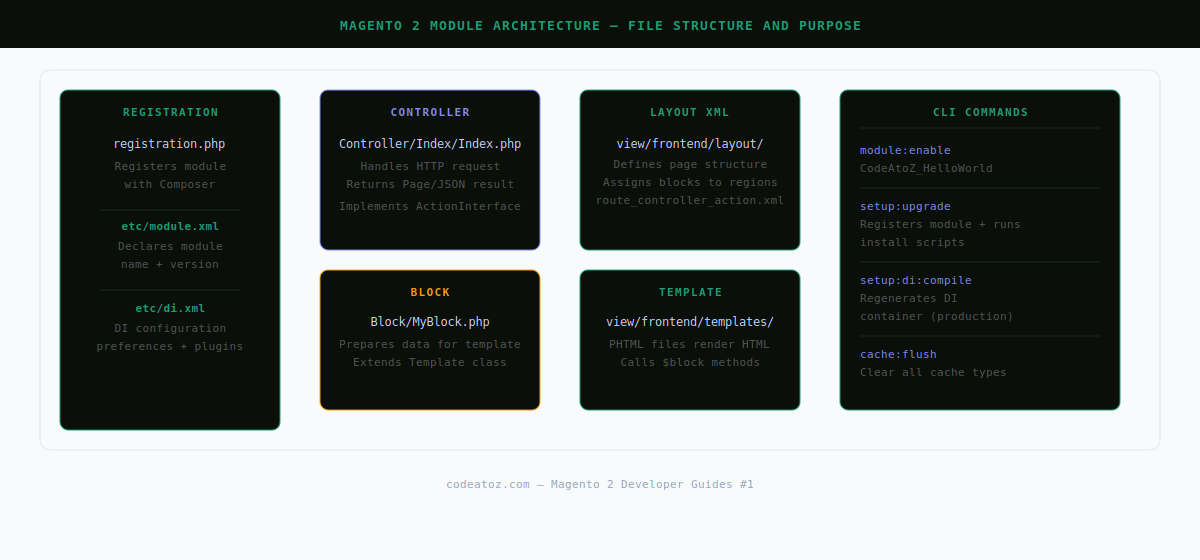
Before you create a Magento 2 module, understand the directory structure. Every module lives under app/code/VendorName/ModuleName/ and requires at minimum two files: registration.php and etc/module.xml.
- registration.php — tells Magento the module exists and where to find it
- etc/module.xml — declares the module name, version, and dependencies
- etc/di.xml — dependency injection configuration (optional but common)
- Block/ — PHP classes that prepare data for templates
- Controller/ — handles HTTP requests, calls models, returns responses
- view/frontend/layout/ — XML files that define page structure
- view/frontend/templates/ — PHTML template files
Step-by-Step: Create a Magento 2 Module from Scratch
mkdir -p app/code/CodeAtoZ/HelloWorld/etc
mkdir -p app/code/CodeAtoZ/HelloWorld/Block
mkdir -p app/code/CodeAtoZ/HelloWorld/Controller/Index
mkdir -p app/code/CodeAtoZ/HelloWorld/view/frontend/layout
mkdir -p app/code/CodeAtoZ/HelloWorld/view/frontend/templatesThis file is autoloaded by Composer and registers the module with Magento’s component registry.
<?php

use MagentoFrameworkComponentComponentRegistrar;

ComponentRegistrar::register(
    ComponentRegistrar::MODULE,
    'CodeAtoZ_HelloWorld',
    __DIR__
);Declares the module to Magento with a name, schema version, and optional dependencies.
<?xml version="1.0"?>
<config xmlns:xsi="http://www.w3.org/2001/XMLSchema-instance"
        xsi:noNamespaceSchemaLocation="urn:magento:framework:Module/etc/module.xsd">
    <module name="CodeAtoZ_HelloWorld" setup_version="1.0.0">
        <sequence>
            <module name="Magento_Catalog"/>
        </sequence>
    </module>
</config><?php
namespace CodeAtoZHelloWorldControllerIndex;
use MagentoFrameworkAppActionHttpGetActionInterface;
use MagentoFrameworkViewResultPageFactory;
class Index implements HttpGetActionInterface
{
public function __construct(
private readonly PageFactory $pageFactory
) {}
public function execute()
{
return $this->pageFactory->create();
}
}<?xml version="1.0"?>
<config xmlns:xsi="http://www.w3.org/2001/XMLSchema-instance"
xsi:noNamespaceSchemaLocation="urn:magento:framework:App/etc/routes.xsd">
<router id="standard">
<route id="helloworld" frontName="helloworld">
<module name="CodeAtoZ_HelloWorld"/>
</route>
</router>
</config><?xml version="1.0"?>
<page xmlns:xsi="http://www.w3.org/2001/XMLSchema-instance"
xsi:noNamespaceSchemaLocation="urn:magento:framework:View/Layout/etc/page_configuration.xsd"
layout="1column">
<body>
<referenceContainer name="content">
<block class="CodeAtoZHelloWorldBlockHello"
name="helloworld.hello"
template="CodeAtoZ_HelloWorld::hello.phtml"/>
</referenceContainer>
</body>
</page><?php
namespace CodeAtoZHelloWorldBlock;
use MagentoFrameworkViewElementTemplate;
class Hello extends Template
{
public function getGreeting(): string
{
return 'Hello from CodeAtoZ_HelloWorld!';
}
}<?php /** @var CodeAtoZHelloWorldBlockHello $block */ ?>
<div style="padding: 40px; font-family: sans-serif;">
<h1><?= $block->escapeHtml( $block->getGreeting() ) ?></h1>
<p>Your Magento 2 module is working correctly.</p>
</div>php bin/magento module:enable CodeAtoZ_HelloWorld
php bin/magento setup:upgrade
php bin/magento setup:di:compile
php bin/magento cache:flush✅ Visit https://yourmagento.test/helloworld — you should see “Hello from CodeAtoZ_HelloWorld!” rendered in your Magento theme’s 1-column layout.
For deeper Magento 2 module development, see our guide on Magento 2 dependency injection, our Magento development services, and the Adobe Commerce component file structure documentation.
Frequently Asked Questions About Creating a Magento 2 Module
What files are required to create a Magento 2 module?
The minimum files to create a Magento 2 module are registration.php and etc/module.xml. Everything else — controllers, blocks, templates, layouts — is optional and added based on what your module needs to do.
Where do I put my Magento 2 module files?
Custom modules go under app/code/VendorName/ModuleName/. Use a unique vendor name (e.g., your company name) and a descriptive module name. Never place custom code inside vendor/ — that directory is managed by Composer and will be overwritten.
Do I need to run setup:upgrade every time I create a Magento 2 module?
Yes — php bin/magento setup:upgrade registers your module with Magento’s module list and runs any install/upgrade scripts. You also need setup:di:compile in production mode to regenerate the dependency injection container after adding new classes.
What is registration.php for in a Magento 2 module?
registration.php tells Magento’s autoloader where the module is located using ComponentRegistrar::register(). Without it, Magento cannot find or load your module even if module.xml is correct. It must be in the root of your module directory.
How do I add a dependency on another module when creating a Magento 2 module?
Add a sequence element inside module.xml listing the dependent module: <sequence><module name=”Magento_Catalog”/></sequence>. This ensures your module loads after the listed one. For hard dependencies (your module cannot function without the other), also add it to composer.json require.
How is a Magento 2 module different from a WordPress plugin?
Magento 2 modules use a stricter architecture with XML-driven configuration, dependency injection, and PSR-4 autoloading. WordPress plugins rely on hooks and global functions. Magento modules require more boilerplate but are more maintainable at scale — the structure enforces separation of concerns from the start.
Need a Custom Magento 2 Module Built?
CodeAtoZ builds production Magento 2 modules — integrations, custom checkout flows, REST APIs, admin UI components, and more.