Next.js WooCommerce Setup — Headless Store with REST API (2026)
Complete Next.js WooCommerce setup guide — App Router, REST API client, ISR product pages, cart state with Zustand, and deployment configuration. Full TypeScript code.
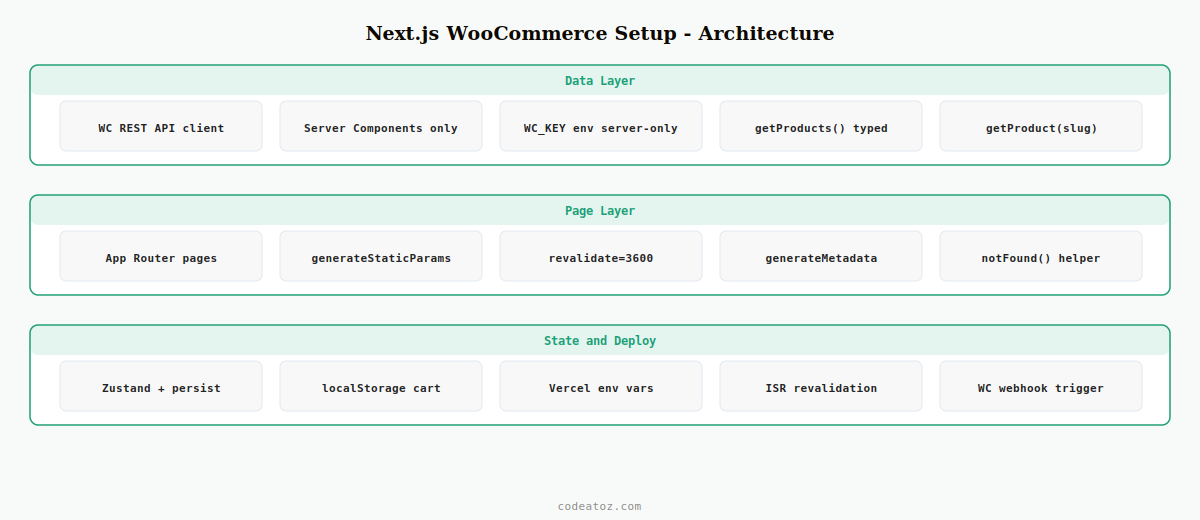
A Next.js WooCommerce setup using the App Router gives you a production-grade headless storefront with server-side rendering, Incremental Static Regeneration for product pages, and full TypeScript type safety. This Next.js WooCommerce setup guide covers everything from the initial project scaffold through the WooCommerce REST API client, ISR product and category pages, Zustand cart state management, and Vercel deployment configuration. By the end of this Next.js WooCommerce setup you will have a working headless store that fetches products and categories from WooCommerce at build time, revalidates them automatically, and manages cart state client-side.
The Next.js WooCommerce setup pattern uses WooCommerce as a headless backend — it stores products, handles orders, and manages inventory, while Next.js owns the entire customer-facing frontend. The WooCommerce REST API v3 provides full read/write access to products, categories, orders, and customers. For the cart and checkout, the WooCommerce Store API (blocks-based, no authentication required) handles the session server-side while Next.js manages the cart UI state.
Step 1: Scaffold the Next.js WooCommerce Setup Project
Create the Next.js project with the App Router and TypeScript, then install the WooCommerce REST API client and Zustand for cart state management.
# Create Next.js app with App Router and TypeScript
npx create-next-app@latest my-wc-store
  --typescript --app --tailwind --eslint --src-dir

cd my-wc-store

# Install WooCommerce REST API client and cart state manager
npm install @woocommerce/woocommerce-rest-api zustand

# Install type definitions
npm install -D @types/node# Next.js WooCommerce setup: WooCommerce REST API credentials
NEXT_PUBLIC_WC_URL=https://your-store.com
WC_KEY=ck_your_consumer_key_here
WC_SECRET=cs_your_consumer_secret_here
# WooCommerce Store API for cart (no auth needed)
NEXT_PUBLIC_WC_STORE_API=https://your-store.com/wp-json/wc/store/v1Step 2: Create the WooCommerce REST API Client for Next.js
A shared API client is the foundation of any Next.js WooCommerce setup. It wraps the WooCommerce REST API package with TypeScript types and a utility for server-side data fetching in Server Components and Route Handlers.
import WooCommerceRestApi from '@woocommerce/woocommerce-rest-api'

// Server-only WooCommerce client for Next.js WooCommerce setup
// This file should ONLY be imported in Server Components or Route Handlers
export const wc = new WooCommerceRestApi({
  url:            process.env.NEXT_PUBLIC_WC_URL!,
  consumerKey:    process.env.WC_KEY!,
  consumerSecret: process.env.WC_SECRET!,
  version:        'wc/v3',
})

export interface WCProduct {
  id:          number
  name:        string
  slug:        string
  price:       string
  regular_price: string
  sale_price:  string
  description: string
  short_description: string
  images:      Array<{ id: number; src: string; alt: string }>
  categories:  Array<{ id: number; name: string; slug: string }>
  stock_status: 'instock' | 'outofstock' | 'onbackorder'
}

export interface WCCategory {
  id:    number
  name:  string
  slug:  string
  count: number
  image: { src: string; alt: string } | null
}

// Typed fetch helpers for Next.js WooCommerce setup Server Components
export async function getProducts( params = {} ): Promise<WCProduct[]> {
  const { data } = await wc.get( 'products', { per_page: 24, status: 'publish', ...params })
  return data
}

export async function getProduct( slug: string ): Promise<WCProduct | null> {
  const { data } = await wc.get( 'products', { slug })
  return data[0] ?? null
}

export async function getCategories(): Promise<WCCategory[]> {
  const { data } = await wc.get( 'products/categories', { per_page: 100, hide_empty: true })
  return data
}
Step 3: Build ISR Product Pages in the Next.js WooCommerce Setup
Incremental Static Regeneration (ISR) is the correct caching strategy for product pages in a Next.js WooCommerce setup. Pages are generated at build time and revalidated in the background at a configurable interval — giving you static performance with near-real-time content freshness.
import { getProduct, getProducts } from '@/lib/woocommerce'
import { notFound }                from 'next/navigation'
import type { Metadata }           from 'next'

// ISR revalidation interval for Next.js WooCommerce setup product pages
export const revalidate = 3600  // re-fetch from WooCommerce every hour

// Generate static paths at build time for the Next.js WooCommerce setup
export async function generateStaticParams() {
  const products = await getProducts({ per_page: 100 })
  return products.map( p => ({ slug: p.slug }) )
}

// Dynamic metadata for SEO in the Next.js WooCommerce setup
export async function generateMetadata(
  { params }: { params: { slug: string } }
): Promise<Metadata> {
  const product = await getProduct( params.slug )
  if ( ! product ) return {}
  return {
    title:       product.name,
    description: product.short_description.replace( /<[^>]+>/g, '' ).slice( 0, 160 ),
    openGraph: {
      images: product.images[0] ? [{ url: product.images[0].src }] : [],
    },
  }
}

export default async function ProductPage(
  { params }: { params: { slug: string } }
) {
  const product = await getProduct( params.slug )
  if ( ! product ) notFound()

  return (
    <main className="max-w-4xl mx-auto px-4 py-12">
      <div className="grid grid-cols-1 md:grid-cols-2 gap-12">
        <img
          src={product.images[0]?.src}
          alt={product.images[0]?.alt || product.name}
          className="rounded-xl w-full object-cover"
        />
        <div>
          <h1 className="text-3xl font-bold mb-4">{product.name}</h1>
          <p className="text-2xl font-semibold text-emerald-600 mb-6">
            £{parseFloat( product.price ).toFixed(2)}
          </p>
          <div
            className="prose mb-8"
            dangerouslySetInnerHTML={{ __html: product.short_description }}
          />
          {/* Cart button — client component handles add to cart */}
          <AddToCartButton productId={product.id} />
        </div>
      </div>
    </main>
  )
}
Step 4: Manage Cart State in the Next.js WooCommerce Setup with Zustand
Cart state in a Next.js WooCommerce setup is client-side. Zustand provides a lightweight store that persists the cart items in localStorage and syncs with the WooCommerce Store API for checkout. This pattern keeps the cart fast and offline-capable while using WooCommerce’s native checkout flow.
'use client'
import { create } from 'zustand'
import { persist } from 'zustand/middleware'

interface CartItem { id: number; name: string; price: number; quantity: number; image: string }
interface CartStore {
  items:     CartItem[]
  addItem:   ( item: Omit<CartItem, 'quantity'> ) => void
  removeItem:( id: number ) => void
  updateQty: ( id: number, qty: number ) => void
  total:     () => number
  count:     () => number
}

// Zustand cart store for Next.js WooCommerce setup
export const useCart = create<CartStore>()(
  persist(
    ( set, get ) => ({
      items: [],
      addItem: ( item ) => set( state => {
        const existing = state.items.find( i => i.id === item.id )
        if ( existing ) {
          return { items: state.items.map( i =>
            i.id === item.id ? { ...i, quantity: i.quantity + 1 } : i
          )}
        }
        return { items: [ ...state.items, { ...item, quantity: 1 } ] }
      }),
      removeItem: ( id ) => set( s => ({ items: s.items.filter( i => i.id !== id ) })),
      updateQty:  ( id, qty ) => set( s => ({
        items: qty <= 0
          ? s.items.filter( i => i.id !== id )
          : s.items.map( i => i.id === id ? { ...i, quantity: qty } : i )
      })),
      total: () => get().items.reduce( ( s, i ) => s + i.price * i.quantity, 0 ),
      count: () => get().items.reduce( ( s, i ) => s + i.quantity, 0 ),
    }),
    { name: 'wc-cart' }
  )
)
The Next.js ISR documentation covers all revalidation strategies. The WooCommerce REST API docs cover all available product and order endpoints for your Next.js WooCommerce setup. See our WooCommerce API React tutorial for the React-only equivalent, and our Node.js WooCommerce integration guide for server-side sync patterns.
Deploying the Next.js WooCommerce Setup to Vercel
Vercel is the natural deployment target for any Next.js WooCommerce setup. Set the environment variables in the Vercel dashboard, push to main, and Vercel handles ISR, edge caching, and on-demand revalidation automatically. The WooCommerce consumer key and secret must be added as encrypted environment variables — never as public NEXT_PUBLIC_ variables since they are server-only credentials.
# Deploy Next.js WooCommerce setup to Vercel
npm install -g vercel
vercel

# Set production environment variables (server-only credentials)
vercel env add WC_KEY        production
vercel env add WC_SECRET     production

# Trigger on-demand ISR revalidation when WooCommerce products update
# Add this webhook in WooCommerce: Settings Webhooks
# URL: https://your-site.vercel.app/api/revalidate?secret=YOUR_SECRET
# Topic: Product updated
Frequently Asked Questions — Next.js WooCommerce Setup
How do I set up Next.js with WooCommerce as a headless backend?
Install @woocommerce/woocommerce-rest-api and create a shared client using your WooCommerce consumer key and secret from environment variables. In Server Components, call wc.get(‘products’) to fetch products at request time or use generateStaticParams with revalidate for ISR. This is the core of any Next.js WooCommerce setup — WooCommerce handles the data, Next.js handles the UI.
Should I use ISR or SSR for product pages in a Next.js WooCommerce setup?
ISR (Incremental Static Regeneration) is the correct choice for most Next.js WooCommerce setup product pages. Set revalidate to 3600 (one hour) for standard products. Use on-demand revalidation via a WooCommerce webhook for immediate updates when products change. Only use SSR (no revalidate) for pages that must show real-time stock levels or personalised pricing on every request.
How do I handle cart state in a Next.js WooCommerce setup?
Use Zustand with the persist middleware to store cart items in localStorage. This keeps the cart available between page navigations and browser refreshes without a server round-trip. For checkout, pass the cart items to the WooCommerce Store API (/wc/store/v1/cart) to create a server-side session, then redirect to WooCommerce’s native checkout page or implement a custom Next.js checkout flow.
Are WooCommerce API credentials safe in a Next.js WooCommerce setup on Vercel?
Yes — store the consumer key and secret as plain environment variables (not NEXT_PUBLIC_ prefixed) in Vercel’s dashboard. Next.js only exposes NEXT_PUBLIC_ variables to the browser bundle. Server Components, Route Handlers, and generateStaticParams all run server-side and can safely access process.env.WC_KEY without exposing it to the client. Never use the WooCommerce REST API credentials in client components in a Next.js WooCommerce setup.
Can I use WooCommerce checkout with a Next.js WooCommerce setup?
Yes — the simplest approach is to pass cart items to the WooCommerce Store API to create a cart session, then redirect to the WooCommerce checkout page for payment. This uses WooCommerce’s battle-tested payment gateway integrations unchanged. Alternatively, use the Store API’s checkout endpoint for a fully custom checkout flow in Next.js, handling payment via Stripe Elements or another frontend SDK in your Next.js WooCommerce setup.
How do I keep product pages up to date in a Next.js WooCommerce setup?
Use ISR with a revalidate interval (e.g. 3600 seconds) as the baseline. For immediate updates when a product is edited in WooCommerce, set up a WooCommerce webhook (Settings Webhooks, topic Product Updated) pointing to a Next.js Route Handler that calls revalidatePath() or revalidateTag() on the specific product path. This gives your Next.js WooCommerce setup both static performance and near-instant content freshness.
Need a Headless WooCommerce Store Built?
CodeAtoZ builds production Next.js WooCommerce setups — full App Router architecture, ISR, custom checkout, and Vercel deployment.