The Complete WooCommerce ERPNext Setup Guide — CAZ WooSync in 5 Minutes
Step-by-step WooCommerce ERPNext setup guide: install CAZ WooSync, configure API keys, create your store record, install webhooks, and run your first bulk import.
WooCommerce API key
Store record config
Webhooks setup
Bulk import
Troubleshooting
This WooCommerce ERPNext setup guide walks through every step of installing and configuring CAZ WooSync — from the bench command to your first live sync. Following this WooCommerce ERPNext setup guide precisely takes approximately five minutes on a server with ERPNext already running. There is no theme modification, no WooCommerce plugin dependency, and no configuration beyond what is documented here.
CAZ WooSync is a Frappe Framework app that installs on any ERPNext instance via the standard bench toolchain. It requires no external services, no paid accounts, and no middleware. The WooCommerce ERPNext setup guide below assumes you have ERPNext installed and a WooCommerce site accessible over HTTPS. For local development testing, ngrok is recommended to expose your ERPNext instance to WooCommerce webhooks.
WooCommerce ERPNext Setup Guide: Step 1 — Install CAZ WooSync
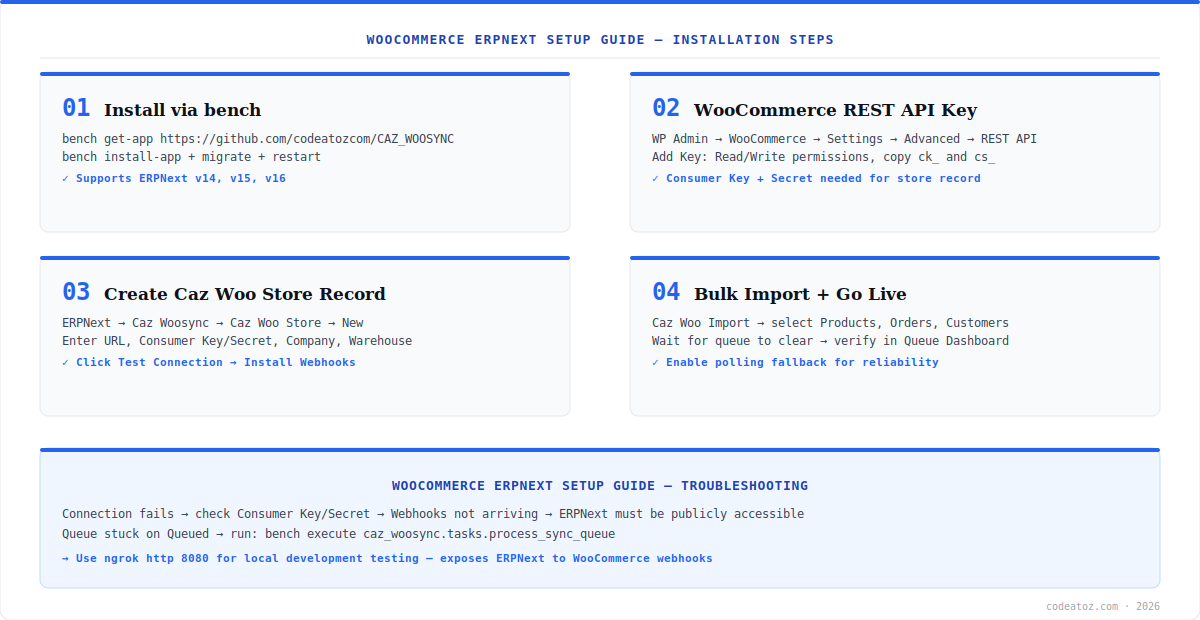
The first step in this WooCommerce ERPNext setup guide is installing the CAZ WooSync Frappe app from GitHub. Run the following commands from your ERPNext bench directory. The install takes one to two minutes depending on server speed.
bench get-app https://github.com/codeatozcom/CAZ_WOOSYNC
bench --site your-site.local install-app caz_woosync
bench --site your-site.local migrate
bench restart
After bench restart, navigate to your ERPNext instance and confirm the Caz Woosync module appears in the top navigation. If it does not appear, run bench clear-cache and hard-refresh your browser. This completes Step 1 of this WooCommerce ERPNext setup guide.
WooCommerce ERPNext Setup Guide: Step 2 — Generate WooCommerce API Key
Step 2 of this WooCommerce ERPNext setup guide is generating the REST API credentials that CAZ WooSync will use to communicate with WooCommerce. In your WordPress Admin panel, go to WooCommerce → Settings → Advanced → REST API and click Add Key.
- Description:
CAZ WooSync - User: Select an admin user with full store access
- Permissions:
Read/Write— both directions require write access - Click Generate API Key
- Copy the Consumer Key (
ck_...) and Consumer Secret (cs_...) — they are shown only once
The Consumer Secret in this WooCommerce ERPNext setup guide step is shown only once. Copy both the Consumer Key and Consumer Secret to a secure location before closing the WooCommerce API page. If you lose the Consumer Secret, you must delete the key and generate a new one — there is no way to retrieve it after leaving the page.
WooCommerce ERPNext Setup Guide: Step 3 — Create the Caz Woo Store Record
Step 3 of this WooCommerce ERPNext setup guide is creating the store record that connects ERPNext to your WooCommerce site. Go to ERPNext → Caz Woosync → Caz Woo Store → New.
- WooCommerce URL — your WordPress site URL (e.g.
https://myshop.com), no trailing slash - Consumer Key — paste the
ck_...key from Step 2 - Consumer Secret — paste the
cs_...secret from Step 2 - Company — select your ERPNext company
- Warehouse — select the warehouse to use for inventory sync
- Income Account — select the revenue account for Sales Invoices
- Click Save — a webhook secret is auto-generated
- Click Test Connection — you should see “Connected ✓”
WooCommerce ERPNext Setup Guide: Step 4 — Install Webhooks and Bulk Import
The final step in this WooCommerce ERPNext setup guide is installing webhooks and seeding your ERPNext with existing WooCommerce data. On the Caz Woo Store record, click Install Webhooks. This registers six webhook types in WooCommerce automatically — order created/updated, product created/updated, customer created, and refund created. Webhooks use HMAC-SHA256 verification with the auto-generated secret.
After webhooks are installed, run the Bulk Import to bring your existing WooCommerce data into ERPNext. Go to ERPNext → Caz Woosync → Caz Woo Import, select your store, tick Customers, Products, and Orders in that order, and click Start Import. The import runs in the background via the queue — monitor progress in the Caz Woo Queue dashboard. Once the import completes, your WooCommerce ERPNext setup guide is done and live sync is active.
# Queue not processing — check workers
bench doctor

# Force queue processing manually
bench --site your-site.local execute caz_woosync.tasks.process_sync_queue

# Local dev — expose ERPNext to WooCommerce webhooks
ngrok http 8080
You have completed this WooCommerce ERPNext setup guide. WooCommerce orders, products, customers, inventory, and prices are now syncing automatically. Monitor the Caz Woo Queue dashboard for the first 24 hours to catch any configuration issues early. Enable Alert Email in Caz Woo Settings to receive failure notifications. The full source code, changelog, and issue tracker are at github.com/codeatozcom/CAZ_WOOSYNC.
Frequently Asked Questions About the WooCommerce ERPNext Setup Guide
How long does the WooCommerce ERPNext setup guide take to complete?
Following this WooCommerce ERPNext setup guide from installation to live sync takes approximately five minutes on a server with ERPNext already running. The four steps — bench install, API key generation, store record creation, and webhook installation — each take about one minute. The initial Bulk Import runs in the background and takes additional time depending on your product and order volume.
Does the WooCommerce ERPNext setup guide require changes to WordPress?
The core WooCommerce ERPNext setup guide requires only generating a WooCommerce REST API key in the WordPress Admin — no theme changes, no plugin installations beyond the optional woo-plugin helper, and no WordPress code modifications. The optional WordPress plugin in the woo-plugin/ folder of the repository adds a settings page in WooCommerce for ERPNext connection details, but it is not required for the integration to work.
Can I follow the WooCommerce ERPNext setup guide for a local ERPNext instance?
Yes, but WooCommerce webhooks require ERPNext to be publicly accessible. For local development, use ngrok to expose your local ERPNext instance. Run ngrok http 8080 (or whichever port ERPNext runs on), then use the ngrok HTTPS URL as the ERPNext URL in the Caz Woo Store record. This makes WooCommerce webhooks deliverable to your local machine.
What ERPNext permissions does the WooCommerce ERPNext setup guide require?
The WooCommerce ERPNext setup guide requires ERPNext System Manager permissions to install the app and create the Caz Woo Store record. For ongoing sync operations, the background worker runs with the system user, which has access to all required doctypes. You do not need to create a dedicated sync user — the app uses ERPNext’s built-in authentication for all operations.
What if Test Connection fails in the WooCommerce ERPNext setup guide?
If Test Connection fails in the WooCommerce ERPNext setup guide, check that the Consumer Key and Consumer Secret are correct and have Read/Write permissions. Ensure WooCommerce REST API is enabled at WooCommerce → Settings → Advanced → REST API → Enable the REST API checkbox. For local setups, use the machine’s IP address instead of localhost. Check ERPNext Error Log for the specific error message.
Is there a WooCommerce ERPNext setup guide for multi-store configurations?
Yes. For multi-store setups, repeat Step 3 of this WooCommerce ERPNext setup guide for each WooCommerce store — create a separate Caz Woo Store record per store with its own URL, Consumer Key/Secret, Warehouse, and Income Account. Each store operates independently with its own sync queue and webhook registrations. There is no limit to the number of stores you can connect.
Ready to Complete Your WooCommerce ERPNext Setup?
CAZ WooSync is free, installs in 5 minutes, and covers every sync you need. Need help with setup or custom configuration? Our team is here.
613 tests passing
ERPNext v14/v15/v16
Free MIT licence