Magento 2 Layout XML Guide — Blocks, Containers & Handle System (2026)
The Magento 2 layout XML guide is essential knowledge for any developer customising the Magento 2 frontend — it controls which blocks appear on which pages, their order, their template assignments, and the data they receive. Understanding the Magento 2 layout XML guide system means you can add, remove, move, and configure any block on any page without touching core template files. This Magento 2 layout XML guide covers the handle system, the difference between containers and blocks, referenceContainer vs referenceBlock, the move and remove directives, passing arguments to block classes, and the correct override approach for customising Magento core layout.
Magento 2 layout XML files are loaded based on the current request. The handle system determines which layout XML files apply — default.xml applies everywhere, catalog_product_view.xml applies only on product pages, customer_account_index.xml applies only on the My Account dashboard. Magento merges all applicable handle files together, so your module’s layout XML changes stack cleanly on top of core layout without modifying any core files.
Magento 2 Layout XML Guide: Handles, Containers, and Blocks
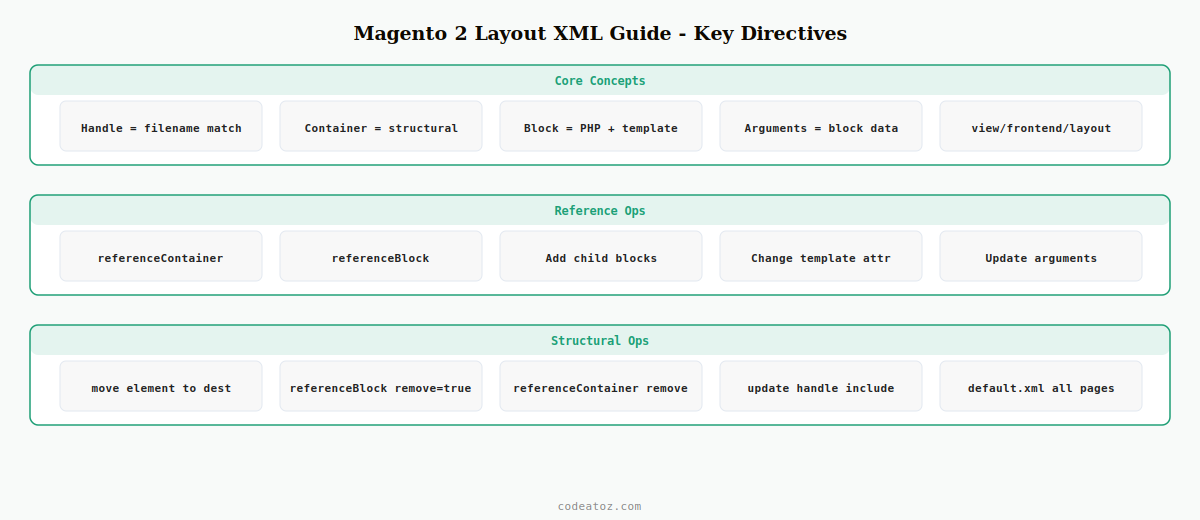
The three core concepts in the Magento 2 layout XML guide system are handles (which layout applies), containers (structural wrappers with no output), and blocks (PHP classes that render HTML via template files).
<?xml version="1.0"?>
<!-- Filename: view/frontend/layout/catalog_product_view.xml -->
<!-- This Magento 2 layout XML guide handle applies to all product pages -->
<page xmlns:xsi="http://www.w3.org/2001/XMLSchema-instance"
      xsi:noNamespaceSchemaLocation="urn:magento:framework:View/Layout/etc/page_configuration.xsd">
    <body>

        <!-- Container: structural wrapper, no PHP class, just renders children -->
        <container name="vendor.module.custom.wrapper"
                   htmlTag="div"
                   htmlClass="caz-product-custom"
                   label="Custom Product Wrapper"
                   after="product.info.main">

            <!-- Block: has a PHP class and a template file -->
            <block class="VendorModuleBlockProductCustomInfo"
                   name="vendor.module.custom.info"
                   template="Vendor_Module::product/custom-info.phtml"
                   before="-">

                <!-- Arguments passed to the block PHP class via Magento 2 layout XML guide -->
                <arguments>
                    <argument name="show_extended" xsi:type="boolean">true</argument>
                    <argument name="title" xsi:type="string">Technical Specifications</argument>
                    <argument name="max_items" xsi:type="number">5</argument>
                </arguments>
            </block>
        </container>

    </body>
</page>
Magento 2 Layout XML Guide: referenceContainer and referenceBlock
The most powerful pattern in the Magento 2 layout XML guide is using referenceContainer and referenceBlock to modify existing layout elements without overriding whole layout files. You can add children to an existing container, change a block’s template, or update its arguments.
<?xml version="1.0"?>
<!-- Magento 2 layout XML guide: default.xml applies to ALL pages -->
<page xmlns:xsi="http://www.w3.org/2001/XMLSchema-instance"
      xsi:noNamespaceSchemaLocation="urn:magento:framework:View/Layout/etc/page_configuration.xsd">
    <body>

        <!-- Add a block to an existing container anywhere in the Magento 2 layout XML -->
        <referenceContainer name="header.panel">
            <block class="VendorModuleBlockHeaderNotice"
                   name="vendor.module.header.notice"
                   template="Vendor_Module::header/notice.phtml"
                   after="-"/>
        </referenceContainer>

        <!-- Change an existing block's template — Magento 2 layout XML guide override -->
        <referenceBlock name="footer"
                        template="Vendor_Module::html/footer.phtml"/>

        <!-- Update arguments on an existing block -->
        <referenceBlock name="logo">
            <arguments>
                <argument name="logo_alt" xsi:type="string">Custom Store Logo</argument>
            </arguments>
        </referenceBlock>

    </body>
</page>
Magento 2 Layout XML Guide: Move and Remove Directives
The move directive repositions blocks without touching their definition. The remove directive hides blocks entirely. Both are key tools in any Magento 2 layout XML guide workflow for customising Magento’s default page structure.
<?xml version="1.0"?>
<page xmlns:xsi="http://www.w3.org/2001/XMLSchema-instance"
      xsi:noNamespaceSchemaLocation="urn:magento:framework:View/Layout/etc/page_configuration.xsd">
    <body>

        <!-- Move a block to a different container — Magento 2 layout XML guide -->
        <move element="catalog.compare.sidebar"
              destination="sidebar.main"
              before="wishlist_sidebar"/>

        <!-- Remove a block from all pages using this Magento 2 layout XML guide handle -->
        <referenceBlock name="report.bugs" remove="true"/>

        <!-- Disable a container — prevents it and all children from rendering -->
        <referenceContainer name="right" remove="true"/>

    </body>
</page>
Magento 2 Layout XML Guide: Create a Custom Handle
Custom layout handles let you apply layout changes to a specific page defined by your module. Add a new handle with the naming convention routeid_controllerid_actionid.xml.
<!-- Filename: view/frontend/layout/vendor_module_product_detail.xml -->
<!-- This Magento 2 layout XML guide handle fires for vendor/module/product/detail route -->
<page xmlns:xsi="http://www.w3.org/2001/XMLSchema-instance"
      layout="2columns-left"
      xsi:noNamespaceSchemaLocation="urn:magento:framework:View/Layout/etc/page_configuration.xsd">

    <update handle="catalog_product_view"/> <!-- Include another handle's layout -->

    <head>
        <title>Custom Product Detail</title>
        <css src="Vendor_Module::css/custom-detail.css"/>
    </head>

    <body>
        <referenceContainer name="content">
            <block class="VendorModuleBlockProductDetail"
                   name="vendor.module.product.detail"
                   template="Vendor_Module::product/detail.phtml"/>
        </referenceContainer>
    </body>
</page>
The Adobe Commerce layout XML documentation covers the complete Magento 2 layout XML guide including all available directives and element attributes. The Magento 2 layout XML instructions reference lists every instruction available in the layout XML system. See our Magento 2 DI guide for writing block classes that receive arguments from layout XML, and our override templates guide for the equivalent approach in WooCommerce.
💡 Never edit core Magento layout XML files directly. Always use referenceContainer and referenceBlock in your module’s layout files to modify core layout. Direct edits to core files are overwritten on every Magento update and break the upgrade path. The Magento 2 layout XML guide merge system is specifically designed so all customisations can be made from custom modules without touching vendor/magento/.
Frequently Asked Questions — Magento 2 Layout XML Guide
What is a layout handle in the Magento 2 layout XML guide?
A layout handle is a named identifier that determines which layout XML files apply to the current request. The handle name matches the layout XML filename in view/frontend/layout/. The handle default.xml applies to every page. Handles like catalog_product_view.xml apply only when Magento identifies the request as a product page. You can also add custom handles programmatically from a controller action using $this->addPageLayoutHandles().
What is the difference between a container and a block in the Magento 2 layout XML guide?
Containers in the Magento 2 layout XML guide are structural wrappers that have no PHP class and render only their children inside an HTML tag. They provide the structural skeleton of the page. Blocks have a PHP class (extending AbstractBlock), a template file, and can access data and business logic. Blocks render their output using phtml template files. Always use containers for structural layout and blocks for content that requires PHP logic.
How do I add a block to an existing Magento 2 page using layout XML?
Create a layout XML file in your module’s view/frontend/layout/ directory with the handle name matching the target page (e.g. catalog_product_view.xml for product pages). Inside the body element, use referenceContainer or referenceBlock to target an existing element, then add a child block element with your class, name, and template. Run bin/magento cache:clean after adding the Magento 2 layout XML guide file to see your changes.
How do I pass arguments to a block in the Magento 2 layout XML guide?
Add an arguments element inside the block element in your Magento 2 layout XML guide file. Each argument has a name and xsi:type attribute. Types include string, boolean, number, array, and object. In the block’s PHP class, retrieve arguments with $this->getData(‘argument_name’) or $this->getArgumentName(). Use arguments to make blocks configurable from layout XML without hardcoding values in the block class.
How do I remove a block on a specific page using the Magento 2 layout XML guide?
Create a layout XML file for the specific handle (e.g. checkout_cart_index.xml to target the cart page) and use referenceBlock with the block’s name and remove=”true” attribute. This removes the block only on pages with that handle. To remove a block from all pages, add the referenceBlock in default.xml. Run bin/magento cache:flush after changes to the Magento 2 layout XML guide files.
How do I find a block’s name to use in referenceBlock?
Enable Magento developer mode and set bin/magento dev:template-hints:enable. This shows template hints on the frontend with each block’s class and template path. The block name is visible in the Magento admin under System Developer Template Path Hints, or you can search the Magento 2 layout XML files in vendor/magento/ for the block class you want to target. Enable block names in hints with the block hints extension to see names directly on the page in your Magento 2 layout XML guide workflow.
Need Magento 2 Frontend Customisation?
CodeAtoZ customises Magento 2 page layouts via XML — adding, repositioning, and configuring blocks correctly without touching core files.