How to Create a WooCommerce Custom Endpoint — Complete PHP Guide
Build, authenticate and test your own WooCommerce REST API endpoint from scratch. Full working code included.
A WooCommerce custom endpoint lets you expose exactly the store data you need — nothing more, nothing less. Whether you’re building a mobile app, a headless React storefront, or syncing orders to an ERP, a WooCommerce custom endpoint gives you full control over the data shape, authentication, and business logic. This guide walks you through creating, securing, and testing a production-ready WooCommerce custom endpoint using register_rest_route().
WooCommerce ships with a comprehensive REST API covering products, orders, customers and more. But there are always situations where the built-in endpoints don’t quite fit — you need a combined response, a custom calculation, or access to data from your own plugin. That’s where a WooCommerce custom endpoint comes in.
In this tutorial, we’ll build a real-world example: a /wc/v3/store-summary endpoint that returns live sales stats. Every concept here applies to any WooCommerce custom endpoint you build, from simple GET routes to authenticated POST handlers.
PREREQUISITES
- WordPress 6.0+ with WooCommerce 7.0+ installed
- PHP 8.0 or higher
- A child theme or custom plugin to add your code
- Basic familiarity with PHP functions and WordPress hooks
- Postman (or similar API client) for testing
What Is a WooCommerce Custom Endpoint and When Do You Need One?
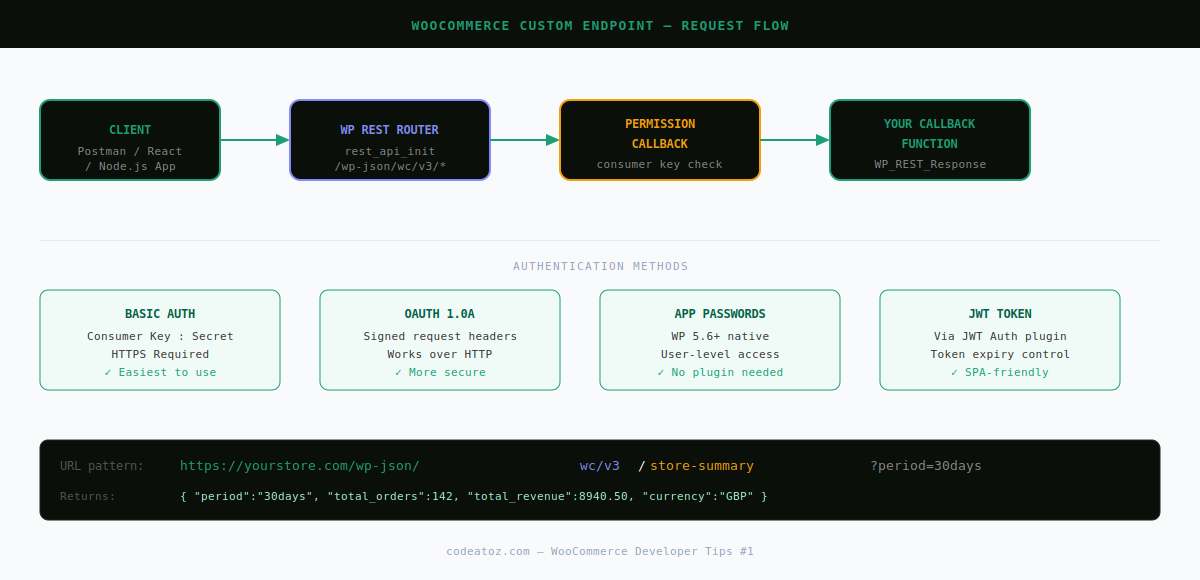
The WooCommerce REST API is built on top of the WordPress REST API. Every route is registered using register_rest_route(), which maps a URL namespace and path to a PHP callback function. When you create a WooCommerce custom endpoint, you’re doing exactly the same thing — adding your own route to the router.
You need a WooCommerce custom endpoint when:
- You need a combined response that would require multiple API calls otherwise
- Your plugin stores data not exposed by the built-in WooCommerce endpoints
- You’re building a headless storefront that needs a bespoke data shape
- You want to trigger server-side business logic (like generating a PDF invoice)
- You’re integrating with a third-party system (ERP, CRM, fulfilment)
How register_rest_route() Works for a WooCommerce Custom Endpoint
The core function is register_rest_route(). It takes three arguments: a namespace (like wc/v3), a route pattern, and an array of arguments that define the methods, callback, and permissions.
add_action( 'rest_api_init', function () {
    register_rest_route(
        'wc/v3',                    // namespace
        '/store-summary',           // route path
        [
            'methods'             => WP_REST_Server::READABLE, // GET
            'callback'            => 'my_store_summary_callback',
            'permission_callback' => 'my_store_summary_permissions',
        ]
    );
} );
The namespace should match WooCommerce’s own (wc/v3) when your endpoint relates to WooCommerce data — this makes the URL intuitive: /wp-json/wc/v3/store-summary. For plugin-specific endpoints, use your own namespace like my-plugin/v1.
Step-by-Step: Building the WooCommerce Custom Endpoint
Hook into rest_api_init and call register_rest_route(). Place this in your plugin’s main PHP file or your theme’s functions.php.
add_action( 'rest_api_init', 'register_store_summary_endpoint' );

function register_store_summary_endpoint() {
    register_rest_route( 'wc/v3', '/store-summary', [
        [
            'methods'             => WP_REST_Server::READABLE,
            'callback'            => 'get_store_summary',
            'permission_callback' => 'store_summary_permission_check',
            'args'                => [
                'period' => [
                    'default'           => '30days',
                    'sanitize_callback' => 'sanitize_text_field',
                    'validate_callback' => function( $value ) {
                        return in_array( $value, [ '7days', '30days', 'year' ], true );
                    },
                ],
            ],
        ],
        [
            'methods'             => WP_REST_Server::CREATABLE,
            'callback'            => 'update_store_settings',
            'permission_callback' => 'store_admin_permission_check',
        ],
    ] );
}The permission callback runs before your main callback. It must return true to allow access or a WP_Error / false to block it. For WooCommerce endpoints, check for a valid consumer key using wc_rest_check_manager_permissions(), or use WordPress capabilities for simpler cases.
function store_summary_permission_check( WP_REST_Request $request ) {
    // Allow access to shop managers and administrators
    if ( current_user_can( 'manage_woocommerce' ) ) {
        return true;
    }

    // Also allow WooCommerce consumer key authentication
    if ( wc_rest_check_manager_permissions( 'reports', 'read' ) ) {
        return true;
    }

    return new WP_Error(
        'rest_forbidden',
        __( 'You do not have permission to access this endpoint.', 'your-plugin' ),
        [ 'status' => 403 ]
    );
}

function store_admin_permission_check( WP_REST_Request $request ) {
    return current_user_can( 'manage_options' );
}The callback receives a WP_REST_Request object. Use its methods to read parameters, headers, and the request body. Always return a WP_REST_Response — never echo raw JSON.
function get_store_summary( WP_REST_Request $request ) {
    $period = $request->get_param( 'period' );

    // Calculate date range
    $date_query = [];
    if ( $period === '7days' ) {
        $date_query = [ 'after' => '7 days ago' ];
    } elseif ( $period === '30days' ) {
        $date_query = [ 'after' => '30 days ago' ];
    } elseif ( $period === 'year' ) {
        $date_query = [ 'after' => '1 year ago' ];
    }

    // Fetch orders
    $orders = wc_get_orders( [
        'status'     => [ 'completed', 'processing' ],
        'date_query' => $date_query,
        'limit'      => -1,
        'return'     => 'ids',
    ] );

    $total_orders   = count( $orders );
    $total_revenue  = 0;

    foreach ( $orders as $order_id ) {
        $order          = wc_get_order( $order_id );
        $total_revenue += (float) $order->get_total();
    }

    $data = [
        'period'         => $period,
        'total_orders'   => $total_orders,
        'total_revenue'  => round( $total_revenue, 2 ),
        'currency'       => get_woocommerce_currency(),
        'generated_at'   => current_time( 'c' ),
    ];

    return new WP_REST_Response( $data, 200 );
}WooCommerce’s built-in authentication uses consumer key/secret pairs. Create them under WooCommerce → Settings → Advanced → REST API. You can then authenticate via Basic Auth (HTTPS only) or OAuth 1.0a.
curl -u "ck_xxxxxxxxxxxx:cs_xxxxxxxxxxxx"
"https://yourstore.com/wp-json/wc/v3/store-summary?period=30days"const ck = 'ck_xxxxxxxxxxxx';
const cs = 'cs_xxxxxxxxxxxx';
const base = btoa(`${ck}:${cs}`);
const response = await fetch(
'https://yourstore.com/wp-json/wc/v3/store-summary?period=7days',
{
headers: {
'Authorization': `Basic ${base}`,
'Content-Type': 'application/json',
}
}
);
const data = await response.json();
console.log( data );Open Postman, create a new GET request to https://yourstore.com/wp-json/wc/v3/store-summary. Under the Authorization tab, choose Basic Auth and enter your consumer key and secret. Add period=30days as a query parameter.
✅ A successful response returns HTTP 200 with your JSON payload. If you get 401, check your consumer key permissions are set to “Read” or higher. If you get 404, confirm you flushed permalinks: Settings → Permalinks → Save.
Handling POST Requests in Your WooCommerce Custom Endpoint
POST endpoints work the same way — you just change the method to WP_REST_Server::CREATABLE and read the body with $request->get_json_params().
function update_store_settings( WP_REST_Request $request ) {
    $params = $request->get_json_params();

    // Validate required field
    if ( empty( $params['low_stock_threshold'] ) ) {
        return new WP_Error(
            'missing_param',
            'low_stock_threshold is required.',
            [ 'status' => 400 ]
        );
    }

    $threshold = absint( $params['low_stock_threshold'] );
    update_option( 'woocommerce_notify_low_stock_amount', $threshold );

    return new WP_REST_Response(
        [ 'success' => true, 'threshold' => $threshold ],
        200
    );
}
Common Errors and Fixes for WooCommerce Custom Endpoints
ERROR REFERENCE
404 — Route not found
Fix: Go to Settings → Permalinks → Save Changes to flush the rewrite rules.
401 — Unauthorized
Fix: Consumer key doesn’t have the right permissions. Regenerate with Read/Write access in WooCommerce → Advanced → REST API.
403 — Forbidden
Fix: Your permission_callback is returning false. Check current_user_can() and make sure you’re sending the auth header.
rest_no_route — No route was found matching the URL and request method
Fix: Your namespace/route string has a typo, or the rest_api_init hook isn’t firing. Wrap in add_action(‘rest_api_init’) not init.
Response returns null or empty
Fix: You’re returning void from the callback. Always return a WP_REST_Response object, never echo or exit.
Full Working Plugin: WooCommerce Custom Endpoint
Below is the complete, production-ready plugin you can drop into /wp-content/plugins/my-wc-endpoint/ and activate immediately.
<?php
/**
 * Plugin Name: My WooCommerce Custom Endpoint
 * Description: Adds a /wc/v3/store-summary REST API endpoint.
 * Version:     1.0.0
 */

if ( ! defined( 'ABSPATH' ) ) exit;

add_action( 'rest_api_init', 'mywce_register_routes' );

function mywce_register_routes() {
    register_rest_route( 'wc/v3', '/store-summary', [
        [
            'methods'             => WP_REST_Server::READABLE,
            'callback'            => 'mywce_get_summary',
            'permission_callback' => 'mywce_check_permissions',
            'args'                => [
                'period' => [
                    'default'           => '30days',
                    'sanitize_callback' => 'sanitize_text_field',
                    'validate_callback' => fn( $v ) =>
                        in_array( $v, [ '7days', '30days', 'year' ], true ),
                ],
            ],
        ],
    ] );
}

function mywce_check_permissions() {
    return current_user_can( 'manage_woocommerce' )
        || wc_rest_check_manager_permissions( 'reports', 'read' );
}

function mywce_get_summary( WP_REST_Request $request ) {
    $period = $request->get_param( 'period' );
    $after  = match( $period ) {
        '7days' => '7 days ago',
        'year'  => '1 year ago',
        default => '30 days ago',
    };

    $orders        = wc_get_orders( [
        'status'       => [ 'completed', 'processing' ],
        'date_query'   => [ 'after' => $after ],
        'limit'        => -1,
        'return'       => 'ids',
    ] );

    $revenue = array_sum(
        array_map(
            fn( $id ) => (float) wc_get_order( $id )->get_total(),
            $orders
        )
    );

    return new WP_REST_Response( [
        'period'        => $period,
        'total_orders'  => count( $orders ),
        'total_revenue' => round( $revenue, 2 ),
        'currency'      => get_woocommerce_currency(),
        'generated_at'  => current_time( 'c' ),
    ], 200 );
}
Once activated, flush your permalinks and test the endpoint at /wp-json/wc/v3/store-summary?period=7days. For deeper WooCommerce REST API work, also see our guide on WooCommerce REST API authentication methods and our overview of WooCommerce development services.
Frequently Asked Questions About WooCommerce Custom Endpoints
What is a WooCommerce custom endpoint?
A WooCommerce custom endpoint is a URL route you register using register_rest_route() that maps to your own PHP callback function. It extends the WooCommerce REST API with logic specific to your store, plugin, or integration.
Do I need a WooCommerce custom endpoint for a headless store?
Usually yes — headless React or Next.js stores often need combined data responses or server-side logic that the built-in WooCommerce endpoints don’t provide. A custom endpoint lets you shape the API response exactly how your frontend needs it.
Should my WooCommerce custom endpoint use the wc/v3 namespace?
Use wc/v3 when your endpoint returns WooCommerce-specific data (orders, products, customers). Use your own namespace like myplugin/v1 for business logic or plugin-specific data. Mixing namespaces can confuse API consumers.
How do I authenticate requests to my WooCommerce custom endpoint?
The simplest method is Basic Auth over HTTPS using a consumer key and secret from WooCommerce → Settings → Advanced → REST API. For server-to-server calls, use OAuth 1.0a. For WordPress Application Passwords (WP 5.6+), check current_user_can() in your permission_callback.
Why does my WooCommerce custom endpoint return 404?
The most common cause is stale WordPress rewrite rules. Go to Settings → Permalinks and click Save Changes — this flushes the rules and registers your new route. Also confirm your add_action is hooked to rest_api_init, not init or plugins_loaded.
Can I add parameters to a WooCommerce custom endpoint?
Yes — use the args array in register_rest_route() to define query parameters with sanitize_callback and validate_callback functions. This keeps your endpoint secure and self-documenting. Parameters are accessible via $request->get_param(‘name’) in your callback.
Need a Custom WooCommerce Integration Built?
CodeAtoZ builds bespoke WooCommerce REST API integrations — headless storefronts, ERP syncs, mobile app backends and more. Let’s talk about your project.