Adding a Magento 2 Admin Grid Custom Column — Complete Step-by-Step Guide (2026)
Add a Magento 2 admin grid custom column using UI Components — listing.xml config, data source join, PHP renderer, filtering, and sorting explained with full code.
Adding a Magento 2 admin grid custom column is one of the most frequently requested backend customisations — whether you need to show calculated values, external data, or custom attributes. A Magento 2 admin grid custom column is built using Magento’s UI Component system: a listing.xml file that defines the column label, sorting, filtering, and optionally a PHP renderer class for complex output. This guide covers every file needed for a complete, production-ready Magento 2 admin grid custom column.
Magento 2 admin grids are powered by UI Components — an XML-driven system where each element is declared, not coded. The grid listing, its columns, data source, and toolbar live in a listing.xml file under view/adminhtml/ui_component/. To add a Magento 2 admin grid custom column to an existing grid, you create that file in your own module and Magento merges it.
Step 1: listing.xml — Declare the Magento 2 Admin Grid Custom Column
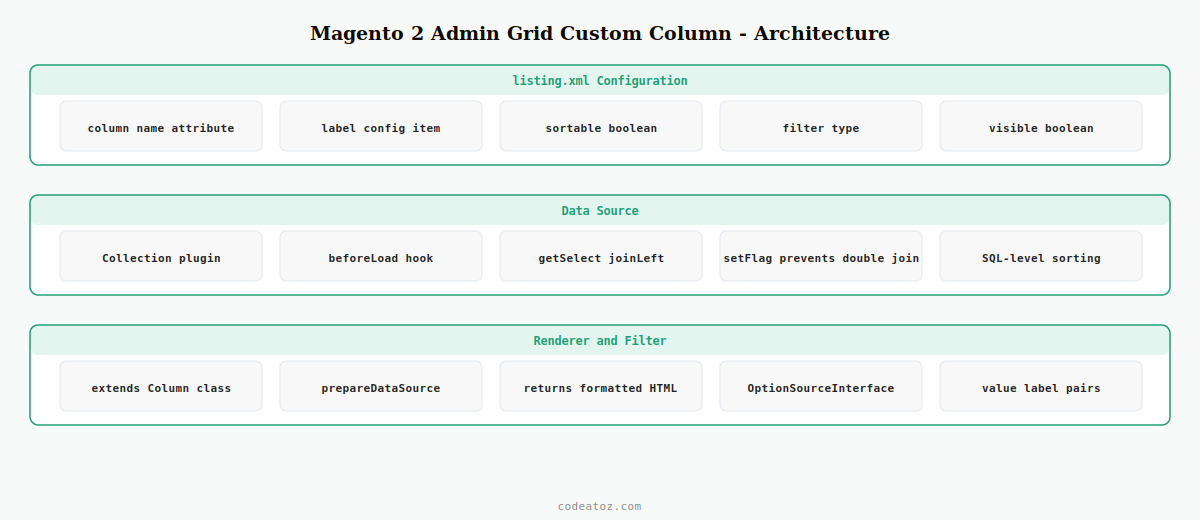
Create view/adminhtml/ui_component/{grid_name}_listing.xml in your module. The filename must exactly match the grid you are extending. Magento automatically merges files with the same name across all active modules.
<?xml version="1.0" encoding="UTF-8"?>
<listing xmlns:xsi="http://www.w3.org/2001/XMLSchema-instance"
         xsi:noNamespaceSchemaLocation="urn:magento:module:Magento_Ui:etc/ui_configuration.xsd">

    <columns name="sales_order_columns">

        <column name="caz_dispatch_status">
            <argument name="data" xsi:type="array">
                <item name="config" xsi:type="array">
                    <item name="label" xsi:type="string" translate="true">Dispatch Status</item>
                    <item name="sortable" xsi:type="boolean">true</item>
                    <item name="filter" xsi:type="string">text</item>
                    <item name="visible" xsi:type="boolean">true</item>
                </item>
            </argument>
        </column>

    </columns>

</listing>
The name="caz_dispatch_status" attribute on the column element must match a field available in the grid’s data source. sortable and filter only work when the field is part of the main SELECT query — not added post-load.
Step 2: Join Data for the Magento 2 Admin Grid Custom Column via a Plugin
A Magento 2 admin grid custom column needs its data in the collection. Use a plugin on the grid collection to join your custom table before the query executes. The plugin must be registered for the specific grid collection class in etc/di.xml.
<?php
namespace CodeAtoZAdminGridPlugin;

class OrderGridCollectionPlugin
{
    public function beforeLoad(
        MagentoSalesModelResourceModelOrderGridCollection $subject
    ): void {
        if ( ! $subject->getFlag('caz_joined') ) {
            $subject->getSelect()->joinLeft(
                ['caz_d' => $subject->getTable('caz_dispatch_status')],
                'main_table.entity_id = caz_d.order_id',
                ['caz_dispatch_status' => 'caz_d.status']
            );
            $subject->setFlag('caz_joined', true);
        }
    }
}<type name="MagentoSalesModelResourceModelOrderGridCollection">
<plugin name="caz_order_grid_custom_column"
type="CodeAtoZAdminGridPluginOrderGridCollectionPlugin"/>
</type>Step 3: Add a PHP Renderer for the Magento 2 Admin Grid Custom Column
For formatted output — status badges, action links, formatted dates — create a renderer class extending MagentoUiComponentListingColumnsColumn. Reference it from the column’s class attribute in listing.xml.
<?php
namespace CodeAtoZAdminGridUiComponentListingColumn;

use MagentoUiComponentListingColumnsColumn;

class DispatchStatus extends Column
{
    public function prepareDataSource( array $dataSource ): array
    {
        if ( isset( $dataSource['data']['items'] ) ) {
            foreach ( $dataSource['data']['items'] as &$item ) {
                $val = $item[ $this->getData('name') ] ?? '';
                $item[ $this->getData('name') ] = sprintf(
                    '<span class="caz-badge caz-badge--%s">%s</span>',
                    strtolower( $val ),
                    ucfirst( $val ) ?: 'N/A'
                );
            }
        }
        return $dataSource;
    }
}<column name="caz_dispatch_status"
class="CodeAtoZAdminGridUiComponentListingColumnDispatchStatus">
<argument name="data" xsi:type="array">
<item name="config" xsi:type="array">
<item name="label" xsi:type="string" translate="true">Dispatch Status</item>
<item name="sortable" xsi:type="boolean">true</item>
<item name="filter" xsi:type="string">select</item>
<item name="options"
xsi:type="object">CodeAtoZAdminGridModelConfigSourceDispatchStatus</item>
</item>
</argument>
</column>The options source class implements MagentoFrameworkDataOptionSourceInterface and returns ['value' => ..., 'label' => ...] pairs for the filter dropdown. See our Magento 2 dependency injection guide for how DI wires these classes. The Adobe Commerce UI Components listing documentation covers all column config options. The Adobe Commerce PHP components guide covers module structure.
Running setup:di:compile and cache:clean After Adding a Magento 2 Admin Grid Custom Column
After creating any new PHP class for a Magento 2 admin grid custom column — the plugin, the renderer, the options source — run bin/magento setup:di:compile to generate interceptors and validate all dependencies. Then run bin/magento cache:clean to clear the UI component configuration cache. In developer mode, cache:clean alone is sufficient for listing.xml changes when no new PHP classes were added.
💡 Common mistake: adding the listing.xml and clearing cache but forgetting to run setup:di:compile after adding the renderer class. The Magento 2 admin grid custom column shows but the renderer class is not found — resulting in a blank column or a PHP fatal.
Frequently Asked Questions — Magento 2 Admin Grid Custom Column
How do I add a Magento 2 admin grid custom column to an existing grid?
Create a listing.xml in your module at view/adminhtml/ui_component/{grid_name}_listing.xml. Add a column element inside the matching columns component. Magento merges your XML with the original. The column name must correspond to a field in the grid data source — either from the main table or joined via a plugin on the collection.
Why is my Magento 2 admin grid custom column not showing after adding listing.xml?
The most common causes: the listing.xml filename does not exactly match the grid component name, the columns element name attribute does not match the original grid’s columns component, or the UI component cache is not cleared. Run bin/magento cache:clean after any listing.xml change. Also verify the column name maps to a field available in the data source.
How do I make a Magento 2 admin grid custom column sortable and filterable?
Set sortable to true and filter to text or select in the column config. The field must be part of the main SELECT query — added via a JOIN in a collection plugin before the query runs. Columns added in afterLoad() cannot be sorted or filtered because those operations execute at the SQL level before afterLoad() is called.
What is a renderer class for a Magento 2 admin grid custom column?
A renderer extends MagentoUiComponentListingColumnsColumn and overrides prepareDataSource() to format the column output — adding HTML badges, links, formatted dates, or calculated values. Reference it via the class attribute on the column element in listing.xml. Run setup:di:compile after creating the renderer class.
Can I add a Magento 2 admin grid custom column without modifying core files?
Yes — this is the correct approach. Create listing.xml in your own module at the same path as the grid you are extending. Magento’s UI component system merges configuration files from all active modules. Use a plugin on the grid collection to join your custom data. Never edit Magento core files or the original module’s listing.xml directly.
Do I need setup:di:compile for every Magento 2 admin grid custom column change?
Run setup:di:compile whenever you add or modify PHP classes — the plugin, renderer, or options source. For listing.xml-only changes with no new PHP classes, cache:clean is sufficient in developer mode. Always run both before deploying to staging or production to ensure the full dependency graph is compiled and the component cache is fresh.
Need Custom Magento 2 Admin Development?
CodeAtoZ builds custom Magento 2 admin grids, UI components, and backend workflows — properly structured and upgrade-safe.